组件特性动作与配置面板扩充
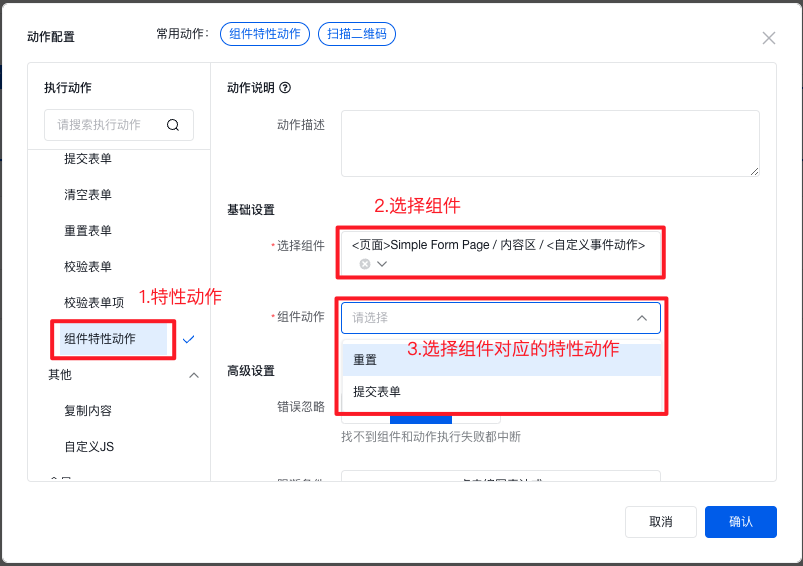
本文介绍如何自定义组件特性动作和组件特性动作配置面板,并结合相关示例进行阐述说明,具体如下 组件特性动作指组件自身独有的动作,用户可以通过通用动作面板中的组件特性动作,选择对应的组件,关联选择的组件对应的动作。 如选中表单时,可以触发表单的重置或者提交动作,如下图
 组件特性动作的扩充主要分两个步骤:组件特性动作注册和组件特性动作配置面板
组件特性动作的注册
因组件特性动作是组件本身特有的行为,所以组件动作的定义,是在组件渲染器中的 doAction 方法中实现。需要注意的是,在组件运行态时,需确保对应组件已经注册在组件管理器(Scoped)里面,然后在 doAction 方法中实现特性动作逻辑。 以日志打印组件为例,如下
import * as React from 'react';
import {Renderer, RendererProps, ScopedContext, createObject, setThemeClassName} from 'amis-core';
import type {ActionObject, IScopedContext, ScopedComponentType} from 'amis-core';
import {registerRendererByType} from 'amis-widget';
import {Button} from 'amis-ui';

type MyActionObject = Omit<ActionObject, 'actionType'> & {
  actionType?: 'resetme';
};
interface MyProps extends RendererProps {
  count: number;
}

interface MyState {
  count: number;
}

class CustomEventAction extends React.Component<MyProps, MyState> {
  static contextType = ScopedContext;

  constructor(props: MyProps, context: IScopedContext) {
    super(props);

    const scoped = context;
    // 注册组件到组件管理器scoped
    scoped.registerComponent(this);

    this.state = {
      count: props.count || 0
    };
  }

  componentWillUnmount() {
    super.componentWillUnmount?.();
    const scoped = this.context as IScopedContext;
    // 卸载注册的组件
    scoped.unRegisterComponent(this);
  }

  // 组件特性动作执行逻辑
  doAction(
    /** 触发的动作信息 */
    action: MyActionObject,
    /** 执行上下文数据 */
    ctx: object,
    /** 是否需要抛错中止执行 */
    throwErrors: boolean = false,
    /** 指定执行的scope */
    delegate?: IScopedContext
  ) {
    if (action.actionType == 'resetme') {
      //TODO 实现对应的组件特性动作
      this.setState({
        count: this.props.count || 0
      });

      return;
    } else if (action.actionType == 'submit') {
      this.handleClick();
    }

    // 不是自己的动作,交给别人处理
    return this.props.onAction(null, action, ctx, throwErrors, delegate || this.context);
  }

  async handleClick() {
    const {data, dispatchEvent} = this.props;
    // 派发beforeSubmit事件
    const beforeClickEvent = await dispatchEvent(
      'beforeSubmit',
      createObject(
        data,
        //TODO 额外追加上下文数据
        {
          count: this.state.count
        }
      )
    );

    // 其中的某个动作可能会阻止原有click相关逻辑执行
    if (beforeClickEvent?.stoped) {
      return;
    }

    //TODO 实现对应的组件特性动作
    console.log('submit form data');

    // 派发submitSucceed事件
    await dispatchEvent('submitSucceed', createObject(data, {}));
  }

  addCount() {
    this.setState(state => {
      return {
        count: state.count + 1
      };
    });
  }

  render() {
    const {
      id,
      label,
      themeCss,
      classnames: cx,
      className,
      wrapperCustomStyle,
      addBtnLabel,
      submitBtnLabel
    } = this.props;
    return (
      <div>
        <div>{label || '事件动作组件示例'}</div>
        <div>{this.state.count} 次</div>
        <Button onClick={() => this.addCount()}>{addBtnLabel || '增加按钮'}</Button>
        <Button onClick={() => this.handleClick()}>{submitBtnLabel || '提交按钮'}</Button>
      </div>
    );
  }
}

registerRendererByType(CustomEventAction, {
  type: 'custom-event-action',
  usage: 'renderer',
  weight: 99,
  framework: 'react'
});
组件特性动作配置面板
因注册的事件动作需要在组件配置面板中展示,同时需要在通用动作面板组件特性动作选择特性组件时展示特性动作,故需要在配置面板中对相关的事件动作进行定义
以示例组件配置面板为例,如下
import {BasePlugin, registerEditorPlugin} from 'amis-editor';

registerEditorPlugin(MyRendererPlugin);
export class MyRendererPlugin extends BasePlugin {
   // events中定义的事件会在图1中展示
  events: RendererPluginEvent[] = [
    {
      eventName: 'click',
      eventLabel: '点击',
      description: '点击时触发',
      // 事件动作触发的上下文信息描述
      dataSchema: [
        {
          type: 'object',
          properties: {
            context: {
              type: 'object',
              title: '上下文',
              properties: {
                nativeEvent: {
                  type: 'object',
                  title: '鼠标事件对象'
                }
              }
            }
          }
        }
      ]
    },
    {
      eventName: 'beforeSubmit',
      eventLabel: '表单提交前',
      description: '表单提交前触发',
      dataSchema: [
        {
          type: 'object',
          properties: {
            data: {
              type: 'object',
              title: '数据',
              description: '当前表单数据,可以通过.字段名读取对应的值'
            }
          }
        }
      ]
    },
    {
      eventName: 'submitSucceed',
      eventLabel: '提交成功',
      description: '点击时触发',
      dataSchema: [
        {
          type: 'object',
          properties: {
            data: {
              type: 'object',
              title: '数据',
              description: '当前表单数据,可以通过.字段名读取对应的值'
            }
          }
        }
      ]
    }
  ];

  // actions中定义的动作会在图2特性动作中显示
  actions = [
    {
      actionType: 'resetme',
      actionLabel: '重置',
      description: '重置组件数据',
      ...getActionCommonProps('reset')
    },
    {
      actionType: 'submit',
      actionLabel: '提交表单',
      description:
        '用户点击提交按钮后,系统开始处理提交表单的请求。这个表单包含了用户填写的各项信息,经过验证和筛选后,将被安全地传输到服务器进行存储或进一步处理。整个提交过程快速且高效,确保用户信息的安全与准确。',
      ...getActionCommonProps('reset')
    }
  ];